Here's another food post (and I'm annoyed that I repeated myself- apparently it is so crucial that you make the quinoa ahead of time so it can cool, that I had to say it twice). I've got to learn to proof-read better.
Anyway, this is a tasty one, so you should go buy the ingredients and make it THIS SECOND.
Greek Quinoa Salad at Butter with a Side of Bread
Showing posts with label Recipes. Show all posts
Friday, July 11, 2014
Wednesday, June 18, 2014
Another Food Post
Clearly I need to post about gardening stuff more often, because now I have two food posts in a row. I've been a bit sidetracked. My beans and corn never came up. At least not more than a handful of plants. I'm not sure if birds ate the seeds as they sprouted, or if my hand watering just didn't go deep enough and the seeds were too dry to germinate. I replanted beans in one bed, and got a couple of pumpkin plants to fill in the other bean bed. I also replanted the corn bed. Then I bought soaker hoses so hopefully they'll water more deeply than my spraying-with-hose method.
In good news, the winer squash plants are growing like crazy, and I have several more jerusalem artichoke plants up.
The thing that has kept me the most busy for the last few days has been the cherries. So far I've been juicing and dehydrating them, but I'm still planning on freezing some for smoothies and pureeing some for cherry fruit leather. Hopefully I'll get a post up soon on the cherry harvest.
Back to the food: I'll be contributing semi-regularly to the blog Butter, with a side of Bread. My most recent post is Spinach Chicken Pasta Salad. It's a really good light summer dinner, or a great dish to bring to a potluck or BBQ.
Friday, May 23, 2014
Guest post at Butter with a Side of Bread!
Check out my guest post at Butter with a Side of Bread today and learn how to make easy peach slurpees.
Peach Slurpees
Peach Slurpees
Monday, May 05, 2014
Mint Chocolate Cake
I made this as a pre-wedding wedding present for my friend, and actually made two since mint chocolate cake sounded like something I needed to eat as well. It worked out nicely to have one cake to experiment with as far as frosting it.
I used two german chocolate cake mixes (for most basic cakes, cake mixes are as good as any made from scratch recipe I've found, my great grandmother agreed with me…) and baked them in four 9 inch round pans. One set of cake pans have a removable bottom making it easy to get cakes out. My other pans are tradition round cake pans, so I use coffee filters flattened in the bottom along with cooking spray, and the cakes came out perfectly.
Once the cakes were cooling on a rack, I started making the mint mousse. I based it off the strawberry mousse recipe I love to use. Instead of pureed fruit, I used whole milk, two or three drops of green food coloring, and 7 drops of peppermint oil to mix with the gelatin. Once that began to thicken, I folded it into my whipped cream. I think next time I will use cream, as this mousse was very light and airy, which went well with the heavy chocolate ganache, but I think cream would make it a little more finished.
I chilled the mousse in the fridge for half an hour and then spooned it onto my two bottom cake layers (I still only made one recipe of the mousse, because the original cake it was meant for had more layers, and there is plenty).
Carefully place the top layer on the mousse and chill cakes.
While the cakes are chilling, you can start on the frosting. I used my standard buttercream (which means I whip a stick of softened butter until it's light and fluffy, then start adding powdered sugar and a little milk until I get a consistency I'm happy with. For this cake I only used a couple tablespoons of butter and instead added in a block of cream cheese. I think for the amount I made, I could have used two blocks, but the frosting turned out minty and smooth without an overpowering cream cheese flavor. I added five or six drops of green food coloring- I wanted a pale green color- and 7 drops of peppermint oil.
After I frosted the cakes, I put them back in the fridge and started on the ganache. I tried a new recipe, and will be using it in the future.
- 1/2 cup heavy cream
- 3 1/2 ounces dark chocolate, finely chopped (preferably 70 percent cacao)
- 1/2 ounce (1 tablespoon) unsalted butter, softened
I doubled the recipe. I actually ended up using a 4 oz bar, and then another 4 oz of imdividally wrapped ghirardeli mint dark chocolates. The mint chocolates gave the ganache just a hint of mint, and it was amazing.
I had a hard time piping mint frosting onto the top of the cake and had to take the bag apart, thin the frosting and start over with a new bag, and in the second attempt, the frosting was softer that I would have liked it, but I didn't want to stop and try again, so I just went with it.
To top it all of I used my cheese slicer to shave Andes mints over the top of the cake.
I wouldn't say it's my most beautiful cake (mostly because the soft frosting didn't stand up well enough on the top, and it's slightly off center), but the pale green is lovely against the chocolate ganache, and the whole thing was incredibly delicious.
Sunday, April 20, 2014
An Egg-volution
We didn't dye easter eggs at my house this year. Our eggs are already multi-colored and my kids don't seem to mind not doing it. I did decide to make hard boiled eggs though, to snack on, and for making egg salad sandwiches (I love those).
Enter the only negative thing about having your own chickens, and "farm fresh" eggs. Fresh eggs DO NOT peel. At all. It's a huge mess and leaves you with a piece of egg that looks like someone took a very small machete to the outside of it. Eggs from the grocery store are not nearly as difficult to peel because they are older than the eggs you gathered from your chickens that day. It can take several weeks for eggs to reach your local grocery store.
I've tried adding oil, adding baking soda, and adding salt to the water, all of which are supposed to make it easier to peel fresh eggs. None of those things worked.
Enter the pressure cooker. My parents bought it for me for Christmas last year and I've been enjoying trying all sorts of things in it. I hadn't done eggs in it before, because it doesn't save much time, but then I read that something about the pressure makes even fresh eggs easier to peel.
I'm converted.
Place the trivet in the bottom of your pressure cooker and add one cup of water. I used my silicone muffin cups to keep the eggs separate (and I did two layers). I did have a couple crack but the cracks didn't seem to affect the finished product at all.
Seal the lid, and set the pressure cooker to cook on high pressure for 4 minutes. When timer goes off, allow it to release pressure naturally for 4 minutes (I didn't pay close enough attention and didn't get to them until 5 minutes had passed- but they turned out perfectly). Release any remaining pressure, remove the eggs and dip them in ice water to cool them down.
The shells will come off easily.
Monday, November 25, 2013
How to make the best pie crust ever.
In a mixing bowl, add 2lbs (about 8 cups, if you don't have a scale) of flour. Half white flour, half whole-wheat. Add 1 TBSP of salt and mix.
Roughly chop up 1 lb of lard. Yes lard. It makes better crust than butter or crisco.
Add the lard chunks a few pieces at a time to the flour/salt. I put my shield on for this since the lard pieces tend to make flour shoot up out of the bowl.
Mix until you get the consistency of "peas and cornmeal".
Add 20 TBSP of cold water. (1 1/4 cups) Mix for a few seconds.
Dump the dough onto a clean surface and form into a wheel.
Plastic wrap is better, but I didn't have any. Wrap up the wheel.
Put it in a bag, get as much air out as you can, and put in the fridge. Let it sit at least 24 hours. I made my crust on a Monday, and will roll it out for pies on Wednesday. Letting it sit makes for a very forgiving, easy to work crust.
When you're ready to use it, take it out, cut it into 8 pie wedges. Each wedge can be formed into a wheel when you're ready for it, then rolled out. Keep the other pieces covered while you work with one to keep them from drying out.
Here's the recipe in an easier-to-print format…
Perfect Pie Crust
From Reclaiming my Inner Pioneer at http://isagoodone.blogspot.com
Ingredients
2lbs (8 cups) of flour. Half white, half whole wheat.
1 lb Lard
1 TBSP salt
20 TBSP (1 1/4 cup) cold water
Directions
- Mix flours and salt.
- Roughly chop lard and add piece by piece to the flour mixture.
- Mix until you have the texture of peas and cornmeal.
- Add water and mix for a few seconds.
- Form into a wheel and place in plastic airtight bag in the fridge for at least 24 hours.
Makes 8 single crust or 4 double crust pies (or whatever combination adds up to 8 single crusts).
Monday, August 19, 2013
Tempura
My Mister decided to make sushi for dinner on Sunday, and we thought it would be fun to invite friends over. With company coming, we needed something besides sushi to fill everyone up, so I decided to try something new. Tempura veggies.
I've never made them before, so I started googling and found a couple of recipes that looked promising, and combined them a bit and came up with this:
![]() |
| Image Credit: http://www.thekitchn.com/how-to-make-tempura-fried-vege-138702 |
I've never made them before, so I started googling and found a couple of recipes that looked promising, and combined them a bit and came up with this:
The key to good tempura is the batter. You want it to be light and runny you aren't making fish sticks.
1/2 cup flour
1/2 cup cornstarch
1 teaspoon baking soda
1 teaspoon baking powder
1 teaspoon sugar
1/2 teaspoon salt
1 egg
2/3 cup ice cold seltzer water or gingerale
Put the egg in Ice Water and mix with chopsticks. Don't mix it perfectly. Dump all of the dry ingredients in. Give it a few choppy mixes with chop sticks. Don't attempt to blend all of the items together. It has to be lumpy for a true tempura texture. Dip and then fry until golden brown.
Enjoy!
I doubled the recipe so we'd have plenty, and it was just barely enough to fry a good sized zucchini, an onion, a sweet potato and several mushrooms.
Once I had the recipe I needed a little more understanding of the How To, and found this website that walked me through all the steps (it's also where the picture came from since we ate ours up too fast to take a picture):
1. Prepare Vegetables
You can tempura fry just about any vegetable you have in the kitchen. In this case we used mushrooms (halved), onions (peeled and sliced), sweet potato (peeled and sliced into rounds), and broccoli florets (from the freezer, no preparation required!).
Other suggestions might include: Bell peppers, carrots, cabbage, green beans, snap peas, cauliflower, baby corn.
2. Heat Your Oil
Bring the oil in your deep fryer or Dutch oven/cast iron pot to 360°F. Some electric fryers only allow you to increase the temperature in specific increments, so if that's the case, go for less temperature and longer frying time for root vegetables and a higher time for things like broccoli that won't require as long of cooking.
3. Prepare the Batter
In a medium to large size mixing bowl, add the rice flour and seasonings (if you wish). Next add the club soda, ensuring that it is cold before mixing. You're looking for the consistency of pancake batter. It should be loose enough to coat things easily, but not drip off completely on the way to the fryer. If the batter is too thick, add club soda or ice water 1 tablespoon at a time until mixture loosens. If too thin, add rice flour 1 tablespoon at a time until it comes together. Bubbles are good, lumps are bad, make sure to mix thoroughly!
4. Coat the Vegetables
Most vegetables can be tossed in the batter bowl ahead of time and allowed to sink a little to coat each one. It's far easier than hand dipping, which means of course that you have one batter covered hand the entire time (not always awesome). Toss items in and help them sink or roll to be coated with the batter. A flat whisk works wonders for this.
5. Fry the Vegetables
Next, lift vegetables out of the batter with your whisk (a fish spatula or large slotted spoon can also work out with success) and allow them to drain slightly, scraping the back of your whisk on the side of the bowl to remove excess. Drop vegetable pieces into the oil one at a time, ensuring that they don't touch. Most everything will immediately sink to the bottom (although mushrooms float). Use a spider strainer or long handled utensil (like a metal skewer) to loosen them and keep them moving. This will allow them to cook evenly on all sides. Cook root vegetables for 4 minutes and all others for 3 This time might differ if your oil is at a different temperature.
6. Remove From Oil
Remove your freshly fried pieces from the oil with a spider or the basket the unit comes with (though truth be told, we like to use the spider no matter what we're cooking in). Place them on a few layers of paper towels to allow remaining oil to drain. Give them a light sprinkling of salt and allow to cool slightly.
7. Return Oil to Temperature
Before dropping in your next load of veggies, make sure your oil comes back up to temperature. If it doesn't, things can get a little soggy and although they'll still be tasty once removed from the fryer, they will be a little greasy instead of crispy and chewy.
8. Repeat
Continue repeating steps 4 through 7 above until all of your vegetables have been coated, fried and hopefully enjoyed! This is a great way to entertain — simply tell people you'll provide the oil and ask them to bring a few of their favorite vegetables and gather round the table! Fry, nibble and chat away and let the good times roll!
Additional Notes:
• On Club Soda: Try tossing your club soda into the freezer while your oil heats up. It will be enough time for things to chill without freezing, allowing you to have perfect tempura pieces coming out of your fryer for longer! The colder the batter, the crispier your crust and less soggy your veggies will be!
Friday, August 09, 2013
Grilled Flatbread Pizza
I planned on making pizza for dinner tonight, and since zucchini week(s) is in full bloom, I thought I'd recreate this delicious zucchini parmesan pizza. Then I saw a link on another blog to flatbread with creamy red pepper scallion spread. I wasn't interested in the spread or the salad (I wanted pizza!), but the flatbread and the grilling sounded amazing. And it was.
I followed the instructions from the blog on the flat bread (except I doubled it):
- 1 tablespoon sugar
- 1 cup warm water
- 2 tablespoons olive oil, plus more for the bowl
- 2 1/4 teaspoons yeast
- 2 cups bread flour (or a little less, see directions)
- 1/2 cup medium grind cornmeal
- 1 teaspoon salt
Add water and sugar to the bowl of a standing mixer fit with a dough hook. Sprinkle in the yeast and let sit for 5 minutes to bloom.
Mix in the olive oil then Add one cup of the flour along with the salt. Mix on low until well incorporated, and then turn the speed up to medium and mix for 3 minutes.
Add another 1/2 cup of flour and the 1/2 cup of cornmeal, and mix well, starting on low and then switching to medium speed. Then add another 1/2 cup of flour, again starting on low and switching to medium. Knead on medium for about 5 minutes. You may occasionally have to get in there with your hands if the dough starts climbing up the hook. It should become smooth and elastic and slightly tacky. At this point, incorporate flour by the tablespoon, with the mixer running. When it starts to seem dry, stop adding flour. This could be anywhere between 1/4 and 1/2 cup. Knead again on medium until it is elastic easy to stretch, about 8 more minutes.
Meanwhile, drizzle about two tablespoons of olive oil into a large mixing bowl. The dough will double in size, so make sure you have enough room. Form the dough into a ball and place in the bowl, tossing it around to coat with oil. Cover the top in plastic wrap and put in a warm place. Let dough rise for about an hour, or until doubled in size.
When dough has doubled, fire up your grill. Keep the flame high and close the lid. If you have a thermometer, it should be at about 500 F.
Somewhere around this point I gathered all my toppings and sliced the veggies (thinly!) I also discovered as I was cooking that since my zucchini was a little on the big side, the slices weren't cooking much, so I took them off and grilled them directly on the grill- do this on a cooler part of your grill while the first side is cooking. It helps to have all the toppings on a tray so they can be easily and quickly transported to the grill.
Punch the dough down, give it a quick knead and tear it into 4 equal-ish pieces. On a large cutting board, form each piece into an oval that is about 8 inches long and 5 inches across. I just use my hands for this, but you can use a rolling pin if you prefer.
Place the dough on the grill. It should take about 3 to 4 minutes for the bottoms to get grill marks and become firm. If it takes a little longer that’s cool, but definitely check one after 3 minutes.
Here is where I diverged from the original recipe. When the first side of the flatbread is cooked (I burned mine a tiny bit on the first round) flip it over, turn down the heat a little and add pizza sauce and any toppings. My favorite combo was the zucchini, eggplant, mushroom, tomato, parmesan cheese and bacon bits. Make sure to put the grilled veggies on at this point and put a little more cheese over the top to hold everything on. Close the grill and cook for a minute or two until the cheese is melted and toppings are as cooked as you'd like them.
Remove pizzas from the grill and cut them into manageable pieces and enjoy. These were incredible. My Mister even commented on how amazing they were after his first bite, and he doesn't dole out praise like that unless he really means it.
I think we'll be using the flatbread recipe instead of pizza dough from now on. The original blog post gives the following instructions for oven baking:
~ If you prefer to bake the breads, you can do so in a 450 F oven, for 12 to 15 minutes. Place directly on a baking stone for the crispiest results, but a large baking sheet will work, too!
I think I might try it sometime when it's not so hot outside, and just roll it out regular pizza style.
Enjoy!
Labels:
Artisan Bread,
bread,
Food,
Grilling,
Recipes,
Vegetarian Dinners
Saturday, January 05, 2013
Chocolate Oreo Cake
We're going to a friend's house for dinner tomorrow, and I volunteered to bring dessert. I have fond memories of my parents' friends, the Kelly's, coming to our house for dinner and bringing the most amazing desserts, and since I didn't have much else going on today, I thought I'd experiment a little. I took three different recipes from pinterest and a google search and combined them all. The recipes are listed at the bottom of the blog post for convenience. It seems a little complicated with three different recipes, but they all came together pretty easily. You could simplify even more by using a devils food or some other chocolate cake mix instead of the Hershey's recipe.
For the cake, I used Hershey's "Perfectly Chocolate" Chocolate Cake.
It turned out really good, but it stuck to the pan really bad. I greased and floured the pan, and I still broke the first cake in half with getting it out of the pan. Next time I'd put a coffee filer on the bottom of the pan to help with cake extraction.
I got the idea of pouring chocolate over a rather lumpy frosting from this mint chocolate chip cake, although I didn't use anything from the actual recipe (this time, it's on my list of cakes, since my kids like mint chocolate chip ice-cream).
For the frosting (including between cake layers), I used Oreo Frosting with Cream Cheese. In the middle layer I left the oreos a little chunkier, but for the outside, I processed them until they were pretty fine. I wanted to be able to pour the chocolate glaze over the top without having any problems with big chunks of oreo. For a two layer cake, I doubled the recipe, just to make sure I could spread it thick since it's hard to spread this frosting thin with the chunks of oreo.
For the glaze, I used a recipe I found on pinterest that went with a chocolate pumpkin cake. I'd really like to make the chocolate pumpkin cake itself sometime, or at least pour this glaze over some other brightly colored frosting. Make sure to chop the chocolate really fine. Mine didn't melt originally, and I ended up have to rig a makeshift double boiler to melt it all. I also waited too long to pour it on the cake, so it didn't spill over the sides as evenly as I would have liked it. That's something that will come with practice, so I see more cakes like this in my future. The glaze itself was actually really easy.
Chocolate Cake:
1 3/4 cups of all-purpose flour
2 cups sugar
3/4 cup cocoa
1 1/2 tsp baking powder
1 1/2 tsp baking soda
1 tsp salt
2 eggs
1 cup milk
1/2 cup vegetable oil
2 tsp vanilla extract
1 cup boiling water
Frosting:
8 oz package cream cheese, room temperature
1/4 cup butter, room temperature
3-4 cups powdered sugar
1/2 tsp vanilla extract
3/4 cup crushed oreos
Whip cream cheese and butter until light and fluffy.
Mix in powdered sugar one cup at a time (until desired thickness is reached- I used 3 cups).
Add vanilla extract.
I topped the whole thing with a couple of oreos cut in half. Not bad for a first try...
For the cake, I used Hershey's "Perfectly Chocolate" Chocolate Cake.
It turned out really good, but it stuck to the pan really bad. I greased and floured the pan, and I still broke the first cake in half with getting it out of the pan. Next time I'd put a coffee filer on the bottom of the pan to help with cake extraction.
I got the idea of pouring chocolate over a rather lumpy frosting from this mint chocolate chip cake, although I didn't use anything from the actual recipe (this time, it's on my list of cakes, since my kids like mint chocolate chip ice-cream).
For the frosting (including between cake layers), I used Oreo Frosting with Cream Cheese. In the middle layer I left the oreos a little chunkier, but for the outside, I processed them until they were pretty fine. I wanted to be able to pour the chocolate glaze over the top without having any problems with big chunks of oreo. For a two layer cake, I doubled the recipe, just to make sure I could spread it thick since it's hard to spread this frosting thin with the chunks of oreo.
![]() |
| Oreo Cream Cheese Frosting |
![]() |
| Make sure to get help licking the beater |
Chocolate Cake:
1 3/4 cups of all-purpose flour
2 cups sugar
3/4 cup cocoa
1 1/2 tsp baking powder
1 1/2 tsp baking soda
1 tsp salt
2 eggs
1 cup milk
1/2 cup vegetable oil
2 tsp vanilla extract
1 cup boiling water
Heat oven to 350°F. Grease and flour two 9-inch round baking pans.
Stir together sugar, flour, cocoa, baking powder, baking soda and salt in large bowl. Add eggs, milk, oil and vanilla; beat on medium speed of mixer 2 minutes. Stir in boiling water (batter will be thin). Pour batter into prepared pans.
Bake 30 to 35 minutes or until wooden pick inserted in center comes out clean. Cool 10 minutes; remove from pans to wire racks. Cool completely.
Frosting:
8 oz package cream cheese, room temperature
1/4 cup butter, room temperature
3-4 cups powdered sugar
1/2 tsp vanilla extract
3/4 cup crushed oreos
Whip cream cheese and butter until light and fluffy.
Mix in powdered sugar one cup at a time (until desired thickness is reached- I used 3 cups).
Add vanilla extract.
Gently stir in crushed Oreos. (I think it was around 9 oreos total)
Glaze:
4 oz finely chopped bittersweet chocolate
1 tbsp cold unsalted butter
3 tbsp corn syrup
1/2 cup heavy cream
Place chopped bittersweet chocolate (I used semi sweet, and while I’m sure the end result is a different flavor than the original, it’s still very good), unsalted butter, and corn syrup in a medium heatproof bowl.
Bring heavy cream to a boil, pour it over the chocolate, and let sit for 3 minutes. Gently stir, using a whisk, until smooth. Let sit for 3 to 5 minutes, until the glaze thickens slightly. Pour the glaze onto the center of the frosted cake and smooth out to the edges to allow the glaze to drop over the sides. Makes 1 cup.
I topped the whole thing with a couple of oreos cut in half. Not bad for a first try...
Thursday, November 15, 2012
Funeral Potatoes without the "cream of..." soups
I love funeral potatoes. It may be a Mormon thing, I don't know. What I do know is that aside from actual funerals, I don't think I ate "real" funeral potatoes until I was married and my Mother-in-Law made them for dinner (along with a ham, because that's what you do). My mom made "Cheesy Potatoes" which are also delicious, but they're not the same thing.
My Mother-in-Law's recipe is the gold standard to which I hold all other funeral potato recipes:
6 boiled, peeled and grated potatoes
Combine:
1/4 cup melted butter
1 can cream of chicken soup
1/2 cup grated cheese
1 cup sour cream
2 cups corn flakes, crushed
Put half of the potatoes in a 9x13 baking dish. Spread with half the mixture, repeat with remaining potatoes and sauce. Cover with crushed corn flakes. Bake at 350 F for 30 minutes.
Now, I'm trying to get away from using cream of anything soups, because they're full of stuff that's hard to pronounce and maybe we shouldn't be consuming. I'll keep eating funeral potatoes made this way when other people make them, because they're still delicious, and it's not every day, but I decided when I make them myself I'd try to find a way to make them without the cream of soup can.
Looking around the internet, I found a recipe that looked promising at realmomkitchen.com. I made it as directed at it was really very good. I think I'd leave out the thyme, and I used Better than Bouillon added directly, and then just milk in place of the chicken broth. It was really easy to make, not much harder than the gold standard (easier if you use store bought hash brown potatoes) So here's my version:
-3 Tbsp butter
-1 medium onion, finely diced
-1/4 cup flour
-1 Tbsp chicken flavored Better than Bouillon soup base
-2 1/2 cups milk
-1 1/2 tsp salt
-Pepper to taste
-2 1/2 cups (or so) shredded cheddar cheese
-1/2 cup sour cream
-6 potatoes peeled, boiled and shredded OR 1 26 oz bag of frozen shredded hash browns, thawed
-2 cups lightly crushed corn flakes
In a large pot over medium heat, melt the butter and saute chopped onion until the onion is soft and starts to caramelize (caramelized onions make everything taste better). Add the flour and stir until it is combined well with the onions and butter. Add the chicken Better than Bouillon and stir, then add the milk. Whisk. Add the salt and pepper. Heat until almost boiling, but not quite, whisk until the mixture begins to thicken. Remove from heat and stir in all but a little of the cheese (save some for topping). Place half of your potatoes in a baking dish, and top with half of the cheese sauce, repeat with remaining potatoes and cheese sauce (you can stir everything together if you want, but it tends to mash the potatoes more, especially if you're using real potatoes you shredded yourself). Sprinkle remaining cheese and crushed corn flakes over the top and bake at 350 for 30 minutes. In a pinch you can use crushed corn chex or other similar cereal.
My Mother-in-Law's recipe is the gold standard to which I hold all other funeral potato recipes:
6 boiled, peeled and grated potatoes
Combine:
1/4 cup melted butter
1 can cream of chicken soup
1/2 cup grated cheese
1 cup sour cream
2 cups corn flakes, crushed
Put half of the potatoes in a 9x13 baking dish. Spread with half the mixture, repeat with remaining potatoes and sauce. Cover with crushed corn flakes. Bake at 350 F for 30 minutes.
Now, I'm trying to get away from using cream of anything soups, because they're full of stuff that's hard to pronounce and maybe we shouldn't be consuming. I'll keep eating funeral potatoes made this way when other people make them, because they're still delicious, and it's not every day, but I decided when I make them myself I'd try to find a way to make them without the cream of soup can.
Looking around the internet, I found a recipe that looked promising at realmomkitchen.com. I made it as directed at it was really very good. I think I'd leave out the thyme, and I used Better than Bouillon added directly, and then just milk in place of the chicken broth. It was really easy to make, not much harder than the gold standard (easier if you use store bought hash brown potatoes) So here's my version:
![]() |
| {Photo Credit} |
-3 Tbsp butter
-1 medium onion, finely diced
-1/4 cup flour
-1 Tbsp chicken flavored Better than Bouillon soup base
-2 1/2 cups milk
-1 1/2 tsp salt
-Pepper to taste
-2 1/2 cups (or so) shredded cheddar cheese
-1/2 cup sour cream
-6 potatoes peeled, boiled and shredded OR 1 26 oz bag of frozen shredded hash browns, thawed
-2 cups lightly crushed corn flakes
In a large pot over medium heat, melt the butter and saute chopped onion until the onion is soft and starts to caramelize (caramelized onions make everything taste better). Add the flour and stir until it is combined well with the onions and butter. Add the chicken Better than Bouillon and stir, then add the milk. Whisk. Add the salt and pepper. Heat until almost boiling, but not quite, whisk until the mixture begins to thicken. Remove from heat and stir in all but a little of the cheese (save some for topping). Place half of your potatoes in a baking dish, and top with half of the cheese sauce, repeat with remaining potatoes and cheese sauce (you can stir everything together if you want, but it tends to mash the potatoes more, especially if you're using real potatoes you shredded yourself). Sprinkle remaining cheese and crushed corn flakes over the top and bake at 350 for 30 minutes. In a pinch you can use crushed corn chex or other similar cereal.
Saturday, September 15, 2012
Salsa Tutorial Plus lots more...
I posted over at Feminist Mormon Housewives this week, head on over and learn how to can your very own salsa, it's easy, and Oh So delicious!
While you're there you can check out my other "Inner Pioneer" posts:
Tuesday, September 11, 2012
Alice Picked a Peck of Pickled Peppers
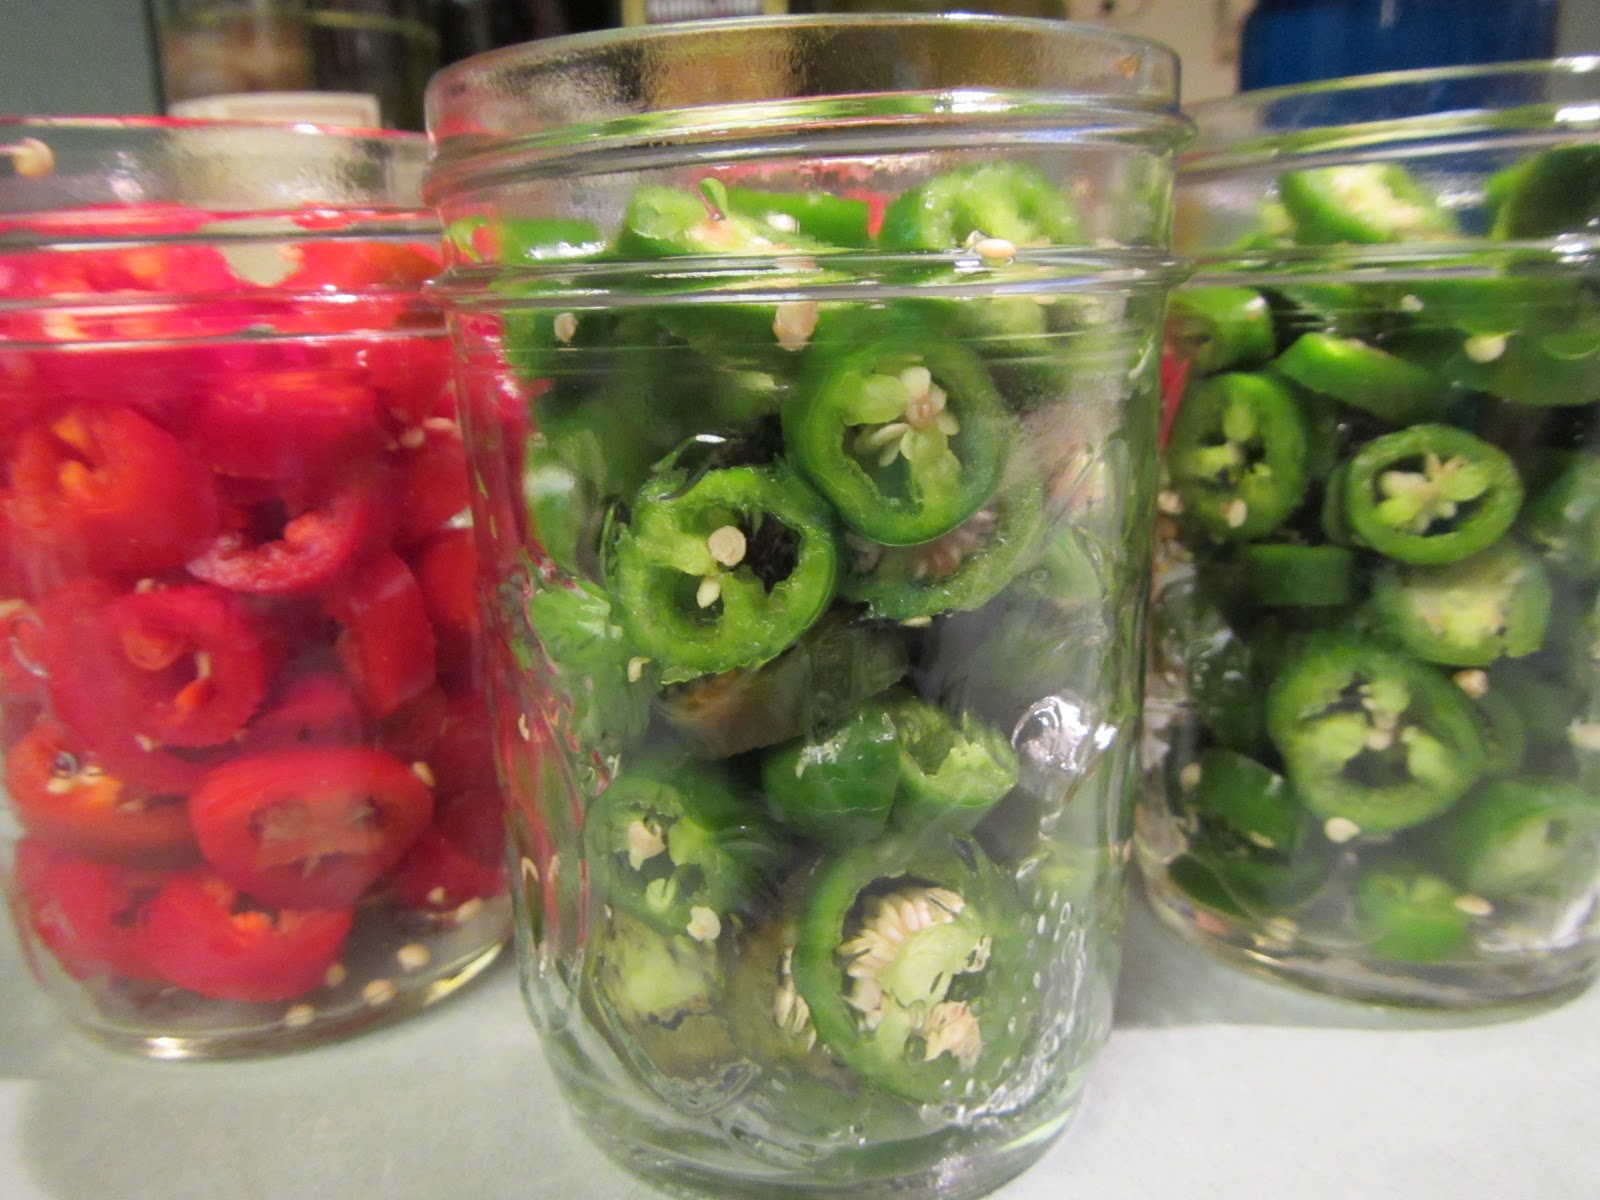
Every year, I plant one or two jalapeno pepper plants. Inevitably, if I plant one, it dies, and if I plant two, they both flourish. The same thing seems to happen with zucchini plants. It just happened that while I was making salsa with my Mister, we took a break for lunch, and he pulled the store bought jar of pickled jalapeno peppers out of the fridge to put some on his sandwich. It was an "aha" moment. Something we've been buying that we don't need to be. A few days later I went out and picked all the jalapeno peppers, did a little googling for a good, simple recipe and got busy. My adjusted recipe worked perfectly for 2 half pints of chopped peppers.
1 quarts jalapeno peppers
1 cups white wine vinegar
1 cups water
1/2 teaspoon pickling salt per half pint
1 small garlic clove peeled, whole per half pint
1 cups white wine vinegar
1 cups water
1/2 teaspoon pickling salt per half pint
1 small garlic clove peeled, whole per half pint
Wash the jalapeno peppers, then, wearing gloves, chop them all into quarter inch slices. The gloves are important so that you don't burn your skin.
Fill your jars, leaving an inch or so headspace (these were packed down a bit before we added the brine).
Add garlic clove and salt.
In a pan, combine vinegar and water and bring to a boil. Pour boiling liquid into jars, wipe rims, and top with 2 piece caps. Process in a boiling water bath canner for 10 minutes (adjusted for altitude in my area it was actually 20 minutes).
This is my first year getting into pickling, and it's so easy, I can't believe I haven't done it before. Remove the jars from the BWB canner, and place on a towel on the counter until cool. Check for seal by pushing in on the lid. If it didn't seal, put it in the fridge and eat it first. Jars that sealed can be wiped down and put in the pantry. Delicious, easy pickled jalapeno peppers ready for use all year!
Labels:
Canning,
Food,
Recipes,
Self-Sufficiency,
Urban Homestead
Friday, January 27, 2012
Easy Beef Bourguignon
I got distracted and missed putting in the bay leaf, thyme, parsley, and allspice (nice huh...)... It still tasted great- a nice thick beef stew. I'll try it again (maybe even with the spices next time).
From: Utah Deal Diva
Easy Beef Bourguignon
6 oz bacon, fried and crumbled
4 TBSP olive oil
2 tsp minced garlic
2 lbs trimmed beef chuck, cut into 2-inch cubes, patted dry with paper towels
Salt and freshly ground pepper
about 1/4 cup of flour
1 medium onion, chopped
1 cup sliced carrots
1 1/2 cups of red cooking wine**
2 cups beef stock or canned beef broth
1 can diced tomatoes, drained
1 bay leaf
1/2 tsp dried thyme
1 tsp dried parsley
1/2 tsp allspice
8-oz container of sliced mushrooms
**In lieu of cooking wine, you can use grape juice, apple juice or instead, use a total of 3 1/2 cups beef broth.
Directions
1. Fry the bacon pieces until they're crispy. While the bacon is cooking, cut the beef up into 2" cubes and lightly pat dry with paper towels. Put 1/4 cup of flour in a small bowl and add a few shakes of both salt and pepper. Coat the beef pieces in the flour and set aside until the bacon is done cooking.
2. Once the bacon is crispy, set it aside on a paper towel. Leave the bacon fat in the pan and add an additional 2 TBSP olive oil. Once the oil is hot, add the beef and brown all sides. Meat doesn't have to be cooked completely, but you want the sides to get nicely browned.
3. Dice onions and slice carrots. Crumble the bacon slices.
4. Once meat is browned, transfer it to a bowl. Don't wash out the pan or feel like you have to scrape the pan out each time. Add another 2 TBSP olive oil and warm that up over medium heat. Once the oil is hot, add the diced garlic, onions and carrots. Toss the vegetables and cook for about 5 minutes. Add the beef back into the pan, along with the bacon.
5. Add remaining ingredients, except for the mushrooms. Start with the cooking wine, adding it in all at once and allowing it to boil slightly before adding in anything else.
6. Stir stew to combine spices with the other ingredients. Cover and simmer for 2-3 hours, stirring once every hour or so. Remove the lid for the last hour of simmering, to allow the stew to thicken.
7. About 15 minutes prior to serving, add the mushrooms.
8. Serve as a main dish alone, or atop mashed potatoes.
Monday, January 02, 2012
Butternut Squash Soup
The other day I remembered the shelf full of squash that is out in the garage and decided we'd better start eating more squash so none of them end up wasted. I've been wanting to try butternut squash soup for awhile, and since we didn't have any other ideas for Sunday dinner, butternut squash soup it was.
My Mister was skeptical, but once he tasted it, he was converted. It wasn't quite as good as the carrot soup we had at The Farm in Park City, but it wasn't too far behind in taste. I may try the recipe with less squash and more carrots sometime...
Melt butter in soup pot. Add chopped onion and celery (unless you're using dried onions and celery, in which case, you can just add them at the same time as all the other vegetables. Also, my addition- add 1-2 cloves of garlic, minced. Chop and peel carrot, potatoes, and squash (it would probably be easier to cook the squash first, but you have to cook the carrot and potatoes anyway, and peeling the squash with the potato peeler wasn't that bad). Add chopped veggies to pot, cook on high stirring constantly until the veggies are browned slightly (I didn't cook mine that long- I waited until they started sticking to the pot, then decided to just go ahead and add the chicken stock- which in my case was chicken base and water). The recipe says to add just enough broth to cover the veggies, but it took all of it for me- I guess my squash was bigger than "medium". I also sprinkled a shake or two of curry powder. Bring to a boil, reduce heat and simmer on low for 40 minutes. (after 25-30 the veggies looked soft enough to me, so I didn't keep cooking them). Next, you blend portions in the blender (or a stick blender would work, right in the pot) until it's all blended.
Serve with salt and pepper, and a sprinkle of parmesan cheese, and crunch bread. You could use vegetable broth if you want to make it vegetarian. My kids actually ate it without complaining- too much. I was surprised. It turned out to be a very nice consistency and the curry wasn't overpowering- I didn't add much, but I could just taste a hint of it. I like butternut squash when it's not covered in brown sugar (I like it sweet too, but this was a nice savory change).
My Mister was skeptical, but once he tasted it, he was converted. It wasn't quite as good as the carrot soup we had at The Farm in Park City, but it wasn't too far behind in taste. I may try the recipe with less squash and more carrots sometime...
I used this recipe from AllRecipes.com with a few alterations based on what I had and the reviews which suggested adding some things to make it not-so-bland. Not-bland soup seems like a good thing.
- 2 tablespoons butter
- 1 small onion, chopped
- 1 stalk celery, chopped
- 1 medium carrot, chopped
- 2 medium potatoes, cubed
- 1 medium butternut squash - peeled, seeded, and cubed
- 1 (32 fluid ounce) container chicken stock
Labels:
Artisan Bread,
bread,
Children,
Cooking,
Food,
Recipes,
Vegetarian Dinners
Subscribe to:
Posts (Atom)