Check out my Inner Pioneer post over at feminist Mormon housewives on how to harden off plants you grew from seed. If you don't harden off seedlings, they'll die when you plant them outside.
Hardening off plants
Wednesday, May 21, 2014


Monday, May 12, 2014
Outside Stuff
I have been wanting to post about the new garden, but between the rain and other delays, there's not a lot going on yet. We've gotten the yard mostly graded, and the raised bed pieces are being worked on (we're getting a unused storage tank from work sliced into rings, which we'll squash into ovals to use as raised beds).
Last weekend we did get the chicken coop moved which was a pretty big job. Here's my Mister using the tractor to move the chicken cube (someday it's going to have a roof and siding). It wasn't located quite legally- too close to the other shed, so we moved it to be safe and legal- and also to give the chickens a better set up in the winter- last winter their food and water area was shaded by the coop, and they didn't get much sun. This will be much better.


Last weekend we did get the chicken coop moved which was a pretty big job. Here's my Mister using the tractor to move the chicken cube (someday it's going to have a roof and siding). It wasn't located quite legally- too close to the other shed, so we moved it to be safe and legal- and also to give the chickens a better set up in the winter- last winter their food and water area was shaded by the coop, and they didn't get much sun. This will be much better.
While we were moving the coop the chickens were all off dust bathing. We thought these looked dead. Funny chickens.
We also moved mama hen and her chicks, and gave them a little free roam time. They were pretty cute.
One sad job was to "off" the rooster. We aren't allowed roosters, so when Buffy the Vampire Slaying Chicken, turned out to be a he, we were pretty sad, and put off the inevitable for as long as possible. With warmer weather though we, and the neighbors, started sleeping with the windows open, and 5am rooster crows just don't work. Goodbye big guy. You were a majestic creature.
One thing that made killing Buffy a little easier was that we have a broody hen, so we gave her some eggs to sit on (we also took a bunch over to the elementary school for a class to try to hatch- they have an incubator). No idea if we'll get any chicks out, but can't hurt to try.
Lemon Mother's Day Cake
While my husband took care of dinner, I decided to make a cake. Inspired by the meyer lemon my friend gave me from her parents' lemon tree. (Oh to live in a climate that could grow things like lemons.)
The cake recipe was pretty straight forward, and I didn't get any pictures. It's a Lemon Cake from Martha Stewart. I used lemon zest that I had in the freezer so I could save my one lemon for topping the cake. While the cake was baking, I thinly sliced the lemons, picked out all the seeds, and combined them with 1/2 cup of sugar and 1/2 cup of water. Bring to a boil and simmer for 25 minutes, then use a slotted spoon to move the lemon slices to a piece of wax paper. The remaining syrup gets a little more lemon juice added to it, then poured over the cake while still warm. Then put the cake in the fridge to cool so you can frost it.


The cake recipe was pretty straight forward, and I didn't get any pictures. It's a Lemon Cake from Martha Stewart. I used lemon zest that I had in the freezer so I could save my one lemon for topping the cake. While the cake was baking, I thinly sliced the lemons, picked out all the seeds, and combined them with 1/2 cup of sugar and 1/2 cup of water. Bring to a boil and simmer for 25 minutes, then use a slotted spoon to move the lemon slices to a piece of wax paper. The remaining syrup gets a little more lemon juice added to it, then poured over the cake while still warm. Then put the cake in the fridge to cool so you can frost it.
The whipped frosting recipe also came from Martha Stewart. I don't think I whipped mine quite long enough- it was more meringue-like that I think it should have been, but it was very good.
All it is is egg whites and sugar and water. Heat over double boiler to 150 F.
Transfer to mixing bowl and whip until stiff, glossy peaks form. Add 2TBSP of lemon juice and whip just until the lemon juice is mixed in.
Spread on cake. :) I didn't frost the center layer of this cake. It didn't need it, and the cakes themselves were a little on the fragile side and it was easier to stack them without worrying about a middle layer. Next time I might try making a lemon curd for the middle- but with the lemon syrup poured onto the warm baked cakes (poke holes with a fork to help it not run off the sides) this cake is plenty sweet and lemony.
Top with candied lemon slices.
It may be different if you whip the frosting longer, but the cake was very reminiscent of a lemon meringue pie.
Monday, May 05, 2014
Mint Chocolate Cake
I made this as a pre-wedding wedding present for my friend, and actually made two since mint chocolate cake sounded like something I needed to eat as well. It worked out nicely to have one cake to experiment with as far as frosting it.
I used two german chocolate cake mixes (for most basic cakes, cake mixes are as good as any made from scratch recipe I've found, my great grandmother agreed with me…) and baked them in four 9 inch round pans. One set of cake pans have a removable bottom making it easy to get cakes out. My other pans are tradition round cake pans, so I use coffee filters flattened in the bottom along with cooking spray, and the cakes came out perfectly.
Once the cakes were cooling on a rack, I started making the mint mousse. I based it off the strawberry mousse recipe I love to use. Instead of pureed fruit, I used whole milk, two or three drops of green food coloring, and 7 drops of peppermint oil to mix with the gelatin. Once that began to thicken, I folded it into my whipped cream. I think next time I will use cream, as this mousse was very light and airy, which went well with the heavy chocolate ganache, but I think cream would make it a little more finished.
I chilled the mousse in the fridge for half an hour and then spooned it onto my two bottom cake layers (I still only made one recipe of the mousse, because the original cake it was meant for had more layers, and there is plenty).


I used two german chocolate cake mixes (for most basic cakes, cake mixes are as good as any made from scratch recipe I've found, my great grandmother agreed with me…) and baked them in four 9 inch round pans. One set of cake pans have a removable bottom making it easy to get cakes out. My other pans are tradition round cake pans, so I use coffee filters flattened in the bottom along with cooking spray, and the cakes came out perfectly.
Once the cakes were cooling on a rack, I started making the mint mousse. I based it off the strawberry mousse recipe I love to use. Instead of pureed fruit, I used whole milk, two or three drops of green food coloring, and 7 drops of peppermint oil to mix with the gelatin. Once that began to thicken, I folded it into my whipped cream. I think next time I will use cream, as this mousse was very light and airy, which went well with the heavy chocolate ganache, but I think cream would make it a little more finished.
I chilled the mousse in the fridge for half an hour and then spooned it onto my two bottom cake layers (I still only made one recipe of the mousse, because the original cake it was meant for had more layers, and there is plenty).
Carefully place the top layer on the mousse and chill cakes.
While the cakes are chilling, you can start on the frosting. I used my standard buttercream (which means I whip a stick of softened butter until it's light and fluffy, then start adding powdered sugar and a little milk until I get a consistency I'm happy with. For this cake I only used a couple tablespoons of butter and instead added in a block of cream cheese. I think for the amount I made, I could have used two blocks, but the frosting turned out minty and smooth without an overpowering cream cheese flavor. I added five or six drops of green food coloring- I wanted a pale green color- and 7 drops of peppermint oil.
After I frosted the cakes, I put them back in the fridge and started on the ganache. I tried a new recipe, and will be using it in the future.
I doubled the recipe. I actually ended up using a 4 oz bar, and then another 4 oz of imdividally wrapped ghirardeli mint dark chocolates. The mint chocolates gave the ganache just a hint of mint, and it was amazing.
I had a hard time piping mint frosting onto the top of the cake and had to take the bag apart, thin the frosting and start over with a new bag, and in the second attempt, the frosting was softer that I would have liked it, but I didn't want to stop and try again, so I just went with it.
To top it all of I used my cheese slicer to shave Andes mints over the top of the cake.
I wouldn't say it's my most beautiful cake (mostly because the soft frosting didn't stand up well enough on the top, and it's slightly off center), but the pale green is lovely against the chocolate ganache, and the whole thing was incredibly delicious.
Sunday, April 20, 2014
An Egg-volution
We didn't dye easter eggs at my house this year. Our eggs are already multi-colored and my kids don't seem to mind not doing it. I did decide to make hard boiled eggs though, to snack on, and for making egg salad sandwiches (I love those).
Enter the only negative thing about having your own chickens, and "farm fresh" eggs. Fresh eggs DO NOT peel. At all. It's a huge mess and leaves you with a piece of egg that looks like someone took a very small machete to the outside of it. Eggs from the grocery store are not nearly as difficult to peel because they are older than the eggs you gathered from your chickens that day. It can take several weeks for eggs to reach your local grocery store.
I've tried adding oil, adding baking soda, and adding salt to the water, all of which are supposed to make it easier to peel fresh eggs. None of those things worked.
Enter the pressure cooker. My parents bought it for me for Christmas last year and I've been enjoying trying all sorts of things in it. I hadn't done eggs in it before, because it doesn't save much time, but then I read that something about the pressure makes even fresh eggs easier to peel.
I'm converted.
Place the trivet in the bottom of your pressure cooker and add one cup of water. I used my silicone muffin cups to keep the eggs separate (and I did two layers). I did have a couple crack but the cracks didn't seem to affect the finished product at all.


Enter the only negative thing about having your own chickens, and "farm fresh" eggs. Fresh eggs DO NOT peel. At all. It's a huge mess and leaves you with a piece of egg that looks like someone took a very small machete to the outside of it. Eggs from the grocery store are not nearly as difficult to peel because they are older than the eggs you gathered from your chickens that day. It can take several weeks for eggs to reach your local grocery store.
I've tried adding oil, adding baking soda, and adding salt to the water, all of which are supposed to make it easier to peel fresh eggs. None of those things worked.
Enter the pressure cooker. My parents bought it for me for Christmas last year and I've been enjoying trying all sorts of things in it. I hadn't done eggs in it before, because it doesn't save much time, but then I read that something about the pressure makes even fresh eggs easier to peel.
I'm converted.
Place the trivet in the bottom of your pressure cooker and add one cup of water. I used my silicone muffin cups to keep the eggs separate (and I did two layers). I did have a couple crack but the cracks didn't seem to affect the finished product at all.
Seal the lid, and set the pressure cooker to cook on high pressure for 4 minutes. When timer goes off, allow it to release pressure naturally for 4 minutes (I didn't pay close enough attention and didn't get to them until 5 minutes had passed- but they turned out perfectly). Release any remaining pressure, remove the eggs and dip them in ice water to cool them down.
The shells will come off easily.
Thursday, March 27, 2014
Chocolate Raspberry Mousse Cake
I made this cake for a fundraising auction. I think it's my best one yet. 2 layers of chocolate cake, Raspberry Mousse filling, raspberry buttercream frosting, chocolate ganache, topped with raspberries and a raspberry glaze.

I used a devils food cake mix, baked using the high altitude directions. Like my great grandmother said, while homemade cakes aren't really that hard, a cake mix is faster, and there's not any noticeable difference (plus, I know the cake will turn out great every time).
The mousse filling recipe came from a strawberry mousse cake recipe I found awhile back. I swapped out the strawberries and used thawed frozen raspberries instead. I also doubled the sugar. In a cake with so much other sweet stuff going on, I actually prefer a slightly less sweet mousse, but some people like things sweeter than I do. If you use the mousse in a pie or for standing alone, be sure to double the sugar.
The frosting was also from that recipe, although I added a bit more powdered sugar to make it stiffer. Again, swapping thawed frozen raspberries for the strawberries. I didn't chop them, just added them into my mixer and let it do the work.
The chocolate ganache recipe is 4oz semisweet or bittersweet chocolate (I use a ghirardeli chocolate bar), 1 TBSP chilled butter, and 3 TBSP karo syrup. Chop the chocolate and butter, and add karo syrup. Bring 1/2 cup cream to a boil and pour over chocolate mix. Let sit for 5 minutes. Stir gently until the chocolate is smooth. let sit for a few more minutes. Pour over cake and use a spatula to direct it over the sides. I poured mine onto a cold cake, so it sets up faster.
After the ganache had cooled, I piped a circle of stars with a blob in the middle, and piled the raspberries up inside the circle.
The cake still needed something else, and my husband suggested some sort of sauce, so I used 1/4 cup of raspberry juice (from my home canned raspberries- mostly water and sugar), but pureed raspberries, strained, with some sugar added would probably work fine too, and dumped a packet of gelatin into it. I let it sit for a few minutes, and then stirred it up. It was still a little lumpy, so I added a little karo syrup to encourage glossy smoothness, and microwaved it for 30 seconds. Then I let it cool in the fridge and when it started to thicken up, I drizzled it over the raspberries.

Thursday, February 20, 2014
2014 Seed Starting
The weather here as alternated between snowstorm, and warm spring. Warm enough that I want to start planting. I'm holding off a bit longer, but I did get my seed starting trays out, washed them, and got them planted. Somewhere in the moves of the last several years, I lost all but the top cover of my third seed starting tray. Since I'm holding off starting perennial flowers and ground cover for the yard until next year (or maybe just later in the summer) when the sprinkler system is finished and the yard is leveled the way we want it with rocks in the right spots, I don't really need the third tray, but it was still a bummer to find it missing. It's probably in a random box out in the garage.
Here are the two planted trays.

I have 48 Opalka tomatoes. We've grown this variety for three or four years now and really like how solid they are. They're perfect for making salsa and canning. Thin skin that comes off easily and thick meaty flesh. Shaped like a large hot pepper.
4 California Wonder, bell peppers that I picked up a couple of years ago at a local store. I think they were Martha Stewart brand.
4 Sweet Banana Peppers. These are a first-try seed for me. The plan is to pickle them.
4 Isis Candy Cherry Tomatoes.
16 Scarlet Kale. These are also a first-try. If we can't eat all of it, we'll share it with the chickens.
4 Jalapeño pepper plants. Hopefully these seeds germinate, since they're several years old. I use jalapeños in our salsa, and also for pickling.
4 Quadrato Asti Giallo Peppers. This was the new variety of bell pepper seeds I decided to try out this year.
12 Mortgage Lifter. This is my second year with this variety. They are big juicy slicing tomatoes. Great for eating with a little salt and pepper.
12 Aunt Molly's Ground Cherry. These are an experiment for this year. I remember a neighbor when I was a kid growing these, picking the fruit off the ground, covered in little paper husks. My grandmother made choke cherry jam, so when I saw these, I was hit with nostalgia and decided to try them out. The seeds are tiny!

Finally, I have 12 Emerald Globe Artichoke plants. These have been in my freezer for two years now, since I forgot to take them out to plant last year, with the house building. Hopefully the seeds think they're well over-wintered and produce this year. Last time I did artichokes, I planted the whole packet of seeds (which was only 8 or something). 5 plants survived, and only one of those survived the next winter. We'll see if I can find a more protected location this year to try to get more to survive. These are perennials in areas that don't get so cold. Here we have to baby them to make it through the winter.
Here are the two planted trays.
I have 48 Opalka tomatoes. We've grown this variety for three or four years now and really like how solid they are. They're perfect for making salsa and canning. Thin skin that comes off easily and thick meaty flesh. Shaped like a large hot pepper.
4 California Wonder, bell peppers that I picked up a couple of years ago at a local store. I think they were Martha Stewart brand.
4 Sweet Banana Peppers. These are a first-try seed for me. The plan is to pickle them.
4 Isis Candy Cherry Tomatoes.
16 Scarlet Kale. These are also a first-try. If we can't eat all of it, we'll share it with the chickens.
4 Jalapeño pepper plants. Hopefully these seeds germinate, since they're several years old. I use jalapeños in our salsa, and also for pickling.
4 Quadrato Asti Giallo Peppers. This was the new variety of bell pepper seeds I decided to try out this year.
12 Mortgage Lifter. This is my second year with this variety. They are big juicy slicing tomatoes. Great for eating with a little salt and pepper.
12 Aunt Molly's Ground Cherry. These are an experiment for this year. I remember a neighbor when I was a kid growing these, picking the fruit off the ground, covered in little paper husks. My grandmother made choke cherry jam, so when I saw these, I was hit with nostalgia and decided to try them out. The seeds are tiny!
Sunday, January 19, 2014
Minecraft Birthday
My kids don't have friend parties every year, so I feel like the years they get to have friends over, I need to make it memorable. This year I didn't have a lot of time to devote to planning, but I was able to find some fun graphics for free online that made everything come together really well.
I got the amazing minecraft graphics from the blog catchmyparty.com


When the cake is cool, run a knife around the edges and turn the pan upside down to get the cake out of the pan. The parchment paper should make it come out pretty easily. I cut a piece of a chocolate wrapper (it was thick paper)- the cake box would work well- to use as a template to cut my squares all the same size (for the most part). I marked my lines and cut about 1/3 of the cake off in a stair step pattern. Part of it I put on top of the other piece and some of it I used underneath the second layer (since my cake was much higher in the middle than the edges- cutting it would have been an option to make it flat, but the sides of my cake weren't very thick. Another possibility is to bake two cakes, cut them both so they're flat and then stack them together- but again, I was trying to keep things simple, so some pieces of cake got used as fillers to level things out. I also cut one piece in half to give myself a couple of short cake levels.
I frosted the tops of some pieces with green buttercream, and used my spreader to rough up the top like grass sort of. I used chocolate buttercream to hide the wedging-layer-job on the sides, and also on some of the top pieces to hold the raw cane sugar on- I don't play minecraft, but I think that is supposed to represent dirt or something?
I cut the rice krispie treats and created a pool and filled in around the edges of the cake.
The jello worked really well. I was worried about getting it from one pan to another, but I dipped the jello pan in warm water briefly, cut a couple of squares and used a spatula to scoop them out. Once I got an edge up, I actually just used my hands to put them in place. They're really solid. I think they were in the fridge for four hours or so. I filled in any cracks with slivers of jello.


I got the amazing minecraft graphics from the blog catchmyparty.com
They had invitations, food cards, banners (which I didn't use- keeping it simple), and all the other printables that you might need for a great minecraft party.
I found this picture on pinterest and decided to try to recreate it.
I baked a chocolate fudge cake mix in a 9x13 pan with a piece of parchment paper cut to size in the bottom. I also sprayed the sides and the paper with cooking spray.
While the cake was baking, I made the blue jello or "water" for the minecraft cake. Instead of following the regular jello directions, you want to make the jello thick so you can maneuver it into place. To make minecraft water jello, you need two LARGE boxes of blue jello. Stir them into 2 1/2 cups of boiling water. Pour into a 9x13 glass pan (it helps to spray the pan with cooking spray first) and place in the fridge.
About this time the cake should be done. Set it aside to cool and get started on the rice krispie treats. I followed the recipe on the bag of mini marshmallows, except I added a couple extra TBSP's of butter, because I think it makes the treats softer, which worked out really well since I decided to fill all the empty space with rice krispy treat.
I frosted the tops of some pieces with green buttercream, and used my spreader to rough up the top like grass sort of. I used chocolate buttercream to hide the wedging-layer-job on the sides, and also on some of the top pieces to hold the raw cane sugar on- I don't play minecraft, but I think that is supposed to represent dirt or something?
I cut the rice krispie treats and created a pool and filled in around the edges of the cake.
The jello worked really well. I was worried about getting it from one pan to another, but I dipped the jello pan in warm water briefly, cut a couple of squares and used a spatula to scoop them out. Once I got an edge up, I actually just used my hands to put them in place. They're really solid. I think they were in the fridge for four hours or so. I filled in any cracks with slivers of jello.
I found paper templates online for making your own minecraft creatures here. The first few kids who arrived saw the cake and were all pretty excited by it. I was surprised that they all wanted jello and rice krispy treats along with the cake and ice cream.
My son made his name out of perler beads. I had intended to make a little black and white minecraft sign too, but I ran out of time. Google perler bead minecraft for some fun ideas though.
My son also decided the cake needed a tree, so he made one out of legos. "I just threw it together mom!"
The printables link has fun drink labels.
And food labels- it was interesting trying to find treats that fit each minecraft label. "coal" for example, was mini oreos.
10 year olds are pretty good at coming up with their own entertainment. We watched a movie, had an impromptu dance party, played "mine and go seek" (I have no idea what that was), ate cake, ate treats, watched funny you tube clips and generally ran around being crazy 10-year-olds. A great time was had by all, I think.
Monday, December 16, 2013
Hacking a Soap Dispenser
When we were picking out faucets for our house, we found one that I really liked (Kyle wasn't such a fan, but it's grown on him) but it came with a soap dispenser. We had one hole to cut for the faucet and one whole for the filtered water tap, so we weren't terribly excited about cutting a third hole for a soap dispenser. The pieces for the soap dispenser sat in a cupboard waiting for whatever we decided to do with them.
I had seen quite a few tutorials for making a mason jar soap dispenser, and it didn't seem very difficult. The hardest parts were probably cutting the lid of the mason jar to accept the soap dispenser pump, and figuring out where to cut the pump pieces themselves to make them fit in the size of mason jar we wanted to use (which was a pint jar).
This pump isn't the same one that I have, but it shows the parts clearly. For our pump we had to cut the majority of the threaded piece off. That is what stretches between your counter top, down to the plastic soap holder below (we didn't need that part, since our soap holder was going to be the pint jar).


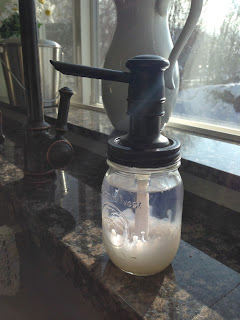
I had seen quite a few tutorials for making a mason jar soap dispenser, and it didn't seem very difficult. The hardest parts were probably cutting the lid of the mason jar to accept the soap dispenser pump, and figuring out where to cut the pump pieces themselves to make them fit in the size of mason jar we wanted to use (which was a pint jar).
This pump isn't the same one that I have, but it shows the parts clearly. For our pump we had to cut the majority of the threaded piece off. That is what stretches between your counter top, down to the plastic soap holder below (we didn't need that part, since our soap holder was going to be the pint jar).

To punch the hole in the top of the mason jar lid, use a hammer and chisel. Also use a block of scrap wood to protect your work surface. Use a marker to trace the size of hole you need, then punch your way around. Be careful not to cut yourself.

Spray paint your lid and ring to match the color of your soap dispenser. We were lucky to have leftover oil rubbed bronze spray paint from another project. I used two coats.

Cut the straw to length. You want it to be cut on an angle so that the bottom tip hits the bottom of the jar. This will allow it to get the last of the soap out (if you don't refill sooner). If it doesn't go to the bottom, you will always have a little bit of soap at the bottom of your jar that never gets used.

When the paint is dry, you can put everything together. My soap dispenser came with a piece that screwed into the top from below the mason jar lid. If yours doesn't, you'll need to break out the glue gun to glue the lid to your pump. Then fill your jar with soap, place the ring over the top and screw it all together.


Also, take note that if you use two different kinds of soaps, they don't really mix together. :)

Monday, November 25, 2013
How to make the best pie crust ever.
In a mixing bowl, add 2lbs (about 8 cups, if you don't have a scale) of flour. Half white flour, half whole-wheat. Add 1 TBSP of salt and mix.

Roughly chop up 1 lb of lard. Yes lard. It makes better crust than butter or crisco.

Add the lard chunks a few pieces at a time to the flour/salt. I put my shield on for this since the lard pieces tend to make flour shoot up out of the bowl.

Mix until you get the consistency of "peas and cornmeal".

Add 20 TBSP of cold water. (1 1/4 cups) Mix for a few seconds.

Dump the dough onto a clean surface and form into a wheel.

Plastic wrap is better, but I didn't have any. Wrap up the wheel.

Put it in a bag, get as much air out as you can, and put in the fridge. Let it sit at least 24 hours. I made my crust on a Monday, and will roll it out for pies on Wednesday. Letting it sit makes for a very forgiving, easy to work crust.

When you're ready to use it, take it out, cut it into 8 pie wedges. Each wedge can be formed into a wheel when you're ready for it, then rolled out. Keep the other pieces covered while you work with one to keep them from drying out.
Here's the recipe in an easier-to-print format…
Perfect Pie Crust
From Reclaiming my Inner Pioneer at http://isagoodone.blogspot.com
Ingredients
2lbs (8 cups) of flour. Half white, half whole wheat.
1 lb Lard
1 TBSP salt
20 TBSP (1 1/4 cup) cold water
Directions
- Mix flours and salt.
- Roughly chop lard and add piece by piece to the flour mixture.
- Mix until you have the texture of peas and cornmeal.
- Add water and mix for a few seconds.
- Form into a wheel and place in plastic airtight bag in the fridge for at least 24 hours.
Makes 8 single crust or 4 double crust pies (or whatever combination adds up to 8 single crusts).
Wednesday, October 02, 2013
What do I do with 80 pounds of chicken?
For the last several years, I tried really hard to only buy farm-raised meat. After watching a few too many documentaries highlighting to horrible conditions of factory farmed meat, I was done.
In practice, what has happened is that we've pretty much stopped eating chicken, aside from the occasional cheat with a costco rotisserie chicken. We tried raising our own meat birds, and buying them from a local-ish farm. But in the end, they always ended up being so expensive that we just couldn't afford to eat chicken very often.
I'm giving up. At least for now. After reading several positive reviews of Zaycon Foods, I decided to give them a try, and ordered two cases of chicken.
I picked up my chicken today and got to work. This morning I made sure to set out all my supplies. Clean jars (with lids and rings ready to go), trays and wax paper for freezing individual breasts (then I'll put them all in gallon sized freezer bags), a cutting board and scissors and a knife. I also had a big bowl for scraps, and disinfectant wipes for just in case. I also put 1/2 cup or so of water into each quart jar. I've read instructions that say to top off the jars with water after, and instructions that say that chicken creates it's own liquid so adding water is unnecessary, and I've read that the chicken doesn't always create quite enough liquid, so adding a little is helpful. I went with the latter.


In practice, what has happened is that we've pretty much stopped eating chicken, aside from the occasional cheat with a costco rotisserie chicken. We tried raising our own meat birds, and buying them from a local-ish farm. But in the end, they always ended up being so expensive that we just couldn't afford to eat chicken very often.
I'm giving up. At least for now. After reading several positive reviews of Zaycon Foods, I decided to give them a try, and ordered two cases of chicken.
I picked up my chicken today and got to work. This morning I made sure to set out all my supplies. Clean jars (with lids and rings ready to go), trays and wax paper for freezing individual breasts (then I'll put them all in gallon sized freezer bags), a cutting board and scissors and a knife. I also had a big bowl for scraps, and disinfectant wipes for just in case. I also put 1/2 cup or so of water into each quart jar. I've read instructions that say to top off the jars with water after, and instructions that say that chicken creates it's own liquid so adding water is unnecessary, and I've read that the chicken doesn't always create quite enough liquid, so adding a little is helpful. I went with the latter.

Two big drippy boxes of raw chicken breasts. The breasts were large and had some fat that needed to be trimmed off, but were really not too bad. I cut them in half, trimmed them up, and cubed them for jars or just left them in individual breasts for freezing.


Add 1 tsp of salt to each quart. (I used canning salt because regular salt will cloud the liquid in the jar, but for chicken, I really don't think it matters, it ends up cloudy looking anyway...


Usually when I wipe jar tops, I just use a damp rag, but chicken is slimy, so I opted for a disposable paper towel and vinegar.

Add lids (I put mind in water, bring it to a boil, let them boil for a short while then put them on).

Add rings, and place them in your pressure canner. Make sure to follow the instructions that came with your canner. I bring the canner to a boil, put on the lid, wait for a steady stream of steam, then set the timer for 10 minutes. After that I add the weight/stop to the lid and watch until the pressure gets to around 13 pounds psi. Then I set the timer for 90 minutes. I'm a little neurotic and checked the three canners I had going today every few minutes to make adjustments to the heat to keep the pressure in the right range.

Once the 90 minutes is up, turn off the heat and wait until the pressure gauge reads zero. DO NOT REMOVE THE WEIGHT OR THE LID BEFORE THAT. It sucks out the liquid from your jar, and also, will hurt you. Once the pressure is gone to zero, carefully (you may want to wear an oven mitt just in case) remove the weight and the lid and using a jar lifter, move the jars to a safe place to cool down. When they're cool check for seal, and any that don't seal should go in the fridge (I'd say reprocess them, but really, after 90 minutes, there's no way I'm redoing that for one jar that didn't seal. We'll just eat it up this week).

I didn't take any pictures of the chicken that went in the freezer, because of slimy raw chicken juice everywhere, but I canned 40 pounds of chicken, and froze the other 40 pounds. I used trays and wax paper, stacking them up so they'd all freeze individually to make them easy to put into bags later.
In the beginning of to 80 pounds of chicken, I cut really carefully so I didn't waste anything. Toward the end I got a little sloppy. I gathered up all the fatty chicken scraps and put them in the crock pot, covered them with water and stuck in some veggies that I happened to have on hand. The crock pot is pretty full, and I haven't quite decided whether to make a huge pot of soup and eat it right away or try adding carrots/celery/onions and canning chicken noodle-less soup.


All in all- it wasn't as bad as I thought it would be, and now I have a shelf full of canned chicken and a freezer full of frozen chicken breasts.
Subscribe to:
Posts (Atom)